Category Archives : Uncategorized

Connect to Exchange Online using remote PowerShell & message format for specific domain

https://technet.microsoft.com/en-us/library/jj984289(v=exchg.150).aspx

$UserCredential = Get-Credential

$Session = New-PSSession -ConfigurationName Microsoft.Exchange -ConnectionUri https://outlook.office365.com/powershell-liveid/ -Credential $UserCredential -Authentication Basic -AllowRedirection
Import-PSSession $Session
{Do work}
When done:
Remove-PSSession $Session
**************************************
To set mail type for specific domain: 
New-RemoteDomain -Name <Name of External Domain> –DomainName
Set-RemoteDomain -Identity <Name of Domain> -TNEFEnabled $false
Get-RemoteDomain -Identity <Name of Domain>| Select TNEFEnabled

RWW and RWA with Windows 10

http://blogs.msmvps.com/bradley/2015/08/06/rww-and-rwa-with-windows-10/


So your client installed Windows 10 and he can’t use RWA/RWW now?

For SBS 2011 you can actually use the Edge browser without adjustment.  It actually works just fine with no adjustment.  If they want to use IE remember you need to use trusted site and compat mode. For SBS 2008 I’m checking with the product team but the story isn’t as good. https://social.technet.microsoft.com/Forums/en-US/fb9b0354-0eaf-4cfe-a6db-aace25fce12a/windows-10-and-remote-web-workplace-rdp?forum=winRDc AE_MGS in the forum found this workaround:Sign in to vote

I found a work around for this on SBS 2008. Navigate to “C:\Program Files\Windows Small Business Server\Bin\webapp\Remote” on the SBS server. In that directory you will find a file named tsweb.aspx, right click it and edit it. Go about 1/4 to 1/3 of the way through the file and look for the section that looks this:

sub window_onload()
Dim targetMachineName
Dim version
On Error Resume Next
version = MsRdpClient.Version
if Err then
msgbox ControlLoadFailed_ErrorMessage,0,RemoteDesktopCaption_ErrorMessage
exit sub
end if
On Error GoTo 0
if strcomp(version,”6.0.6000″) < 0 then
msgbox IncorrectClientVersion_ErrorMessage, 0, RemoteDesktopCaption_ErrorMessage
window.close
exit sub
end if

What I did was to comment out the second part of that statement so it looks like this

‘if strcomp(version,”6.0.6000″) < 0 then
‘   msgbox IncorrectClientVersion_ErrorMessage, 0, RemoteDesktopCaption_ErrorMessage
‘   window.close
‘   exit sub
‘end if

I have done limited testing and this seems to work, but I don’t know if there are any bad side effects at this time. Windows 7 clients do not seem to have issues connecting after this change was made. You also may have to temporarily adjust permissions on that file so that you can save the file. I also had the compatibility mode on and had it as a trusted site, but I have not tested it without those on.

Windows 7 not refreshing network folders – SMB2/Server 2008r2, etc.

https://technet.microsoft.com/en-us/library/ff686200%28WS.10%29.aspx?f=255&MSPPError=-2147217396

new Dword: HKEY_LOCAL_MACHINE\System\CurrentControlSet\Services\Lanmanworkstation\Parameters\DirectoryCacheLifetime and set to 0


  1. Directory cache, by setting DirectoryCacheLifetime to ZERO.
  2. File Not Found cache, by setting FileNotFoundCacheLifetime to ZERO.
  3. File information cache, by setting FileInfoCacheLifetime to ZERO

Use Internet Explorer Enterprise Mode (EMIE)

https://4sysops.com/archives/fix-the-dell-idrac-undefined-and-the-webpage-cannot-be-found-errors/

https://4sysops.com/archives/group-policy-changes-in-windows-8-1-update/#internet-explorer-enterprise-mode

If the Tools > Enterprise Mode option is missing in IE11, you most likely don’t have Enterprise Mode enabled. You can enable EMIE in Group Policy or enable it by making a Registry edit. Open the Registry editor and browse to HKEY_LOCAL_MACHINE\SOFTWARE\Policies\Internet Explorer\. You’ll need to add additional keys by right-clicking the Internet Explorer key and choosing New > Key. The finished structure should be HKEY_LOCAL_MACHINE\SOFTWARE\Policies\Internet Explorer\Main\EnterpriseMode. Last, right-click in the right pane and choose New > String Value and type Enable. Your finished product should look something like this:

Fix Windows 10– Windows Photo Viewer Associations

Clean Windows 10 installs seem to have removed the ability to use Windows Photo Viewer.  While it will still work for TIF files, if you try to open any other file type with it, you just get the Print dialog.

I still find it quite useful over the new Photos app – from the way to zoom to using the keyboard to switch  images, to not wanting videos to show up while viewing photos, I prefer the way it prints, etc…


First I add the stuff below to the registry, that will add the default file types back in Windows Photo Viewer so it can be set as default.  Then using the Default Programs Control Panel, I give Windows Photo Viewer all of its defaults.

Copy & Paste below into .reg file and import, make sure quotes are in correct format before importing:

****

Windows Registry Editor Version 5.00

[HKEY_LOCAL_MACHINE\SOFTWARE\Microsoft\Windows Photo Viewer\Capabilities\FileAssociations]
".bmp"="PhotoViewer.FileAssoc.Tiff"
".dib"="PhotoViewer.FileAssoc.Tiff"
".gif"="PhotoViewer.FileAssoc.Tiff"
".jfif"="PhotoViewer.FileAssoc.Tiff"
".jpe"="PhotoViewer.FileAssoc.Tiff"
".jpeg"="PhotoViewer.FileAssoc.Tiff"
".jpg"="PhotoViewer.FileAssoc.Tiff"
".jxr"="PhotoViewer.FileAssoc.Tiff"
".png"="PhotoViewer.FileAssoc.Tiff"
".tif"="PhotoViewer.FileAssoc.Tiff"
".tiff"="PhotoViewer.FileAssoc.Tiff"

****

I left the PhotoViewer.FileAssoc.Tiff for all because it doesn’t seem to make an a difference to functionality and it was the only actual type in the registry already.

VPN was not configured successfully in Windows Server 2012 Essentials Experience

http://www.tachytelic.net/2014/08/vpn-configured-successfully-windows-server-2012-essentials/

During a recent SBS 2003 to Windows Server 2012 r2 Essentials migration I was having a number of problems setting up anywhere access. The two problems that I was getting were:

  • Anywhere access to your server is blocked
  • VPN was not configured successfully

Windows Server Essentials Anywhere access - VPN was not configured successfully

I searched all over but couldn’t come up with anything useful and the dashboard.log file didn’t show anything useful, just the error:

ConnectivityCenter: RemoteAccessAnalyzer: VPN server deployment result: InstallationFailed

The ports 80 and 443 required for Remote Web Access and VPN were without doubt open but it seemed to me that the wizard always failed at the verification stage, so I figured that it must be seeing something different than I was picking up in my tests.

Now, this server has been configured with a custom domain name of remote.companydomain.com and externally this resolved no problems at all.

But if I tried to ping that address or use nslookup on the essentials server to resolve the external DNS address that had been assigned to the server it failed. Then I realized what was going on.

This system/customer is new to me and I had made the new essentials server a domain controller which also meant that it would have replicated DNS records from the source domain controller.

Although the internal domain name was companyname.local there was also a forward lookup zone for the main companyname.com address space, because the essentials server was rightly using itself as a DNS server it was unable to resolve remote.companyname.com using its own DNS forward lookup zone for the external domain as the record for remote.companyname.com had not been added.

So I had two choices, remove the forward lookup zone or add the remote.companyname.com address to it as an A record. It was obvious after a little investigation why the external domain name had been added to the active directory DNS, but the reason it was include it was no longer appropriate, so I deleted the whole zone.

I then restarted the DNS server and cleared the DNS cache from a command prompt with:

ipconfig /flushdns

and tried to resolve the external domain name again and this now resolved correctly.

So I once again tried to run the Windows Essentials Anywhere Access Wizard and it still failed with the exact same issue! Infuriating! .

It did show one less error this time though and I was down to “VPN was not configured successfully” only this time. This error took make ages to figure out though.

Fixing the VPN was not configured successfully error

I ended up looking through the CBS.LOG file in quite some detail and figured out what the problem was. Thanks to someone on this thread on technet for the inspiration to look there.

When the VPN is being enabled Windows Essentials attempts to setup a Windows Internal Database and in my case failed to do so due to a logon failure as it did not have the “Logon as a Service” privilege. Here is a sample of the log:

2014-08-29 23:04:32, Error CSI 00000001 (F) Logged @2014/8/29:22:04:32.768 : [ml:130{65},l:128{64}]"Attempting to start service {MSSQL$MICROSOFT##WID} synchronously"
[gle=0x80004005]
2014-08-29 23:04:32, Error CSI 00000002 (F) Logged @2014/8/29:22:04:32.893 : [ml:84{42},l:82{41}]"start service MSSQL$MICROSOFT##WID (1069)"
[gle=0x80004005]
2014-08-29 23:04:32, Error CSI 00000003@2014/8/29:22:04:32.893 (F) CMIADAPTER: Inner Error Message from AI HRESULT = HRESULT_FROM_WIN32(1069)
 [
[51]"The service did not start due to a logon failure.

Now I felt I was getting close to the source of the issue, light at the end of the tunnel (you have no idea how long I spent trying to figure this out).

The knowledge base article 2832204 from Microsoft explains how to make the appropriate group policy changes to stop this prevent the specific issue of being unable to start the MSSQL$MICROSOFT##WID service, which is actually the root cause of the wizard not being able to finish.

Here is a screenshot of how I the corrected group policy looked on the system I was working on:

Changing the logon as a service policy to resolve the error "VPN was not configured" on Windows Server Essentials Experience

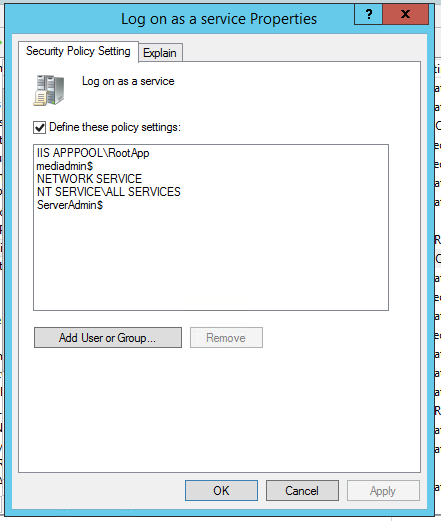
After you have changed the policy run a quick “gpupdate” to make the new policy active and then try running the VPN wizard again, the wizard took a long time to complete but I was fairly confident it was going to work as I could see the SQL database becoming active in Task Manager:

Essentials Anywhere Access Creating a Windows Internal SQL Database

The wizard finally finished with success! I spent a long time trying to figure out the cause of this problem and I am so glad to see the back of it. I really hope this helps you if you are having the same issue.

Poweliks

Begin by disabling dllhost.exe, by following these steps:
Launch command prompt as an Administrator and navigate to one of the following folders:

  • C:\windows\syswow64 (for 64-bit systems)
  • C:\windows\system32 (for 32-bit systems)

Type the following command into command prompt and press enter to take ownership:

  • takeown /f dllhost.exe /a

Type the following command into command prompt and press enter to disable permissions:

  • cacls dllhost.exe /p everyone:n

Restart the computer.

The Post-Deployment Configuration task may fail after you install the Windows Server Essentials Experience role on Windows Server 2012

https://support.microsoft.com/en-us/kb/2914651

To resolve this issue, follow these steps to add the service accounts that are mentioned in Event ID 7041 (that is, DOMAIN\ServerAdmin$ and DOMAIN\MediaAdmin$) to the "Log on as a Service" Group Policy setting.

  1. Start Group Policy Management Console (GPMC). To do this, take one of the following actions: Press the Windows logo key + R to open the RUN dialog box, type gpmc.msc in the text box, and then click OK or press Enter. Or, click Start, click in the Start Search box, type gpmc.msc, and then press Enter.
  2. Right-click Default Domain Controllers Policy, and then click Edit.
  3. Browse to Computer Configuration\Windows Settings\Security Settings\Local Policies\User Rights Assignment.
  4. In the details pane, double-click Log on as a service.
  5. Make sure that the Define these policy settings check box is selected, and then click Add User or Group.
  6. Type the name of the service account that is mentioned in Event ID 7041 For example, type DOMAIN\ServerAdmin$ or DOMAIN\MediaAdmin$. Or, click Browse to locate the account with the Select Users, Computers, or Groups dialog box, and then click OK.
  7. After you have the account name entered, click OK in the Add User or Group dialog box, and then click OK in the Allow log on locally Properties dialog box.
  8. To update the modified Group Policy manually, at command prompt, type gpupdate, and then press Enter.
  9. Rerun the Post-Deployment Configuration task.

How to disable SBS 2003 to 2008/2011 migration grace time period expiration

http://www.bursky.net/index.php/2012/02/disable-sbs-migration-grace-period-expiration/

Without going in to any further details, here’s the process how to prevent the SBS2003 from shutting down after 21 days of migration have passed. The basic principle is to disable the SBS Core Service (sbscrexe.exe). The problem is when you just kill it, it will restart itself automatically. To achieve this goal follow the steps below:
1.Download process explorer from http://technet.microsoft.com/en-us/sysinternals/bb896653
2.Run Process Explorer and SUSPEND the sbscrexe.exe file.
3.Open regedit and navigate to HKEY_LOCAL_MACHINE\SYSTEM\CurrentControlSet\Services\SBCore
4.Right click the key and click permissions. Give the Administrators group full control on both the key and the child nodes.
5.Refresh the key so you can see all of the registry settings for sbcore and change the Start DWORD value from 2 to 4 to disable the service.
6.Using explorer navigate to the sbscrexe.exe file in the C:\WINDOWS\system32 directory and change permissions on the file to everyone deny.
7.Go back to process explorer and kill the sbscrexe.exe process. If it doesn’t start again then you have successfully disabled the file.

« Previous PageNext Page »
Back to Top